I decided that it was time for ball joint replacement. While I had them out I decided to put in the front torsion bar adjusters in preparation for turning the car into a Baja Bug. This is a big job. My recommendation: buy a professionally prepared front end.
Tools: pickle fork, big wrenches (1/2 drive strongly recommended), jack, jack stands, fuel siphon, big ball peen hammer, reciprocating saw, welding outfit, socket sets, hex wrench sockets, high speed grinder with wire brush and cut off wheel, primer, paint, under coating, grease with teflon, 5 foot bar to use as a drift (driver), calipers, dremel tool (small grinder), 2 rolls paper towels, special cold chisel.
Time:
4 hours for first wheel and torsion arms removed
2 hours for second wheel and torsion arms removed
4 hours to remove torsion tubes
2 hours to cut top torsion tube
2 hours to weld adjuster into top tube
2 hours to cut bottom tube and weld adjuster
4 to 6 hours welding and brazing patches over rust on the shock towers
2 hours prepping the beam assembly for paint
1 hour to prime, paint, and undercoat beam assembly
1 hour messing with the steering box
2 hours to put beam assembly into car
3 hours to reassembly beam with torsion arms, etc.
1 hour to lower beam out of car and put on the rubber bushings on the body mounts. Do this before assembly and save an hour of cussing.
1 hour messing with the tie rod ends and steering coupler
1 hour cleaning the outside of the fuel tank, priming, painting a few spots
2 hours refitting fuel tank, including running a bead of silicon sealant, new fuel line, moving wiring grounds to better locations. My tank filler leaked on the first try, so I had fuel fumes in the car for a week. Get the filler tubes on really perfect.
After all that work, time, and energy I should have just bought a new front beam with adjusters. Well, this is a hobby and I had fun...that is to say that some aspects were fun.
My gas tank was full. Not the ideal time to start a job that requires removing the gas tank. It took me at least 45 minutes to siphon out the gas into my small gas cans.
Put the car up on sturdy jack stands. I positioned mine at the rear of the clip. This is underneath where the front of the body joins the pan. I'm not sure it's the best place, but it seemed ok.
You don't have to remove the brakes, drums, etc. Just put a block under them to keep from stretching the brake line/speedo cable. I think I sat mine on the wheels.
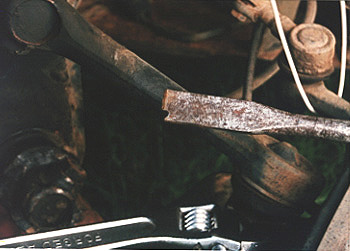
Getting the sway bar off is a real treat. Not. I used the cold chisel in this photo that has a notch in it. The clips on the sway bar clamps can be driven off frontwards. It takes a ton of pounding. If you don't care about saving the parts, save yourself the effort by using the high speed grinder and cutoff wheel. Just cut the clamp or locking wedges. Grrrr.
Incidently, this photo is the left side of the car. That white U shape thing on the right side of the photo is a piece of wire that I was going to use to hold up the wheel/brake drum.
Parts: ball joints, perhaps tie rod ends, front torsion bar adjusters, replacement fuel line, hose clamps, replacement steering coupler, some wire or light rope, urethane bushings, special grease.