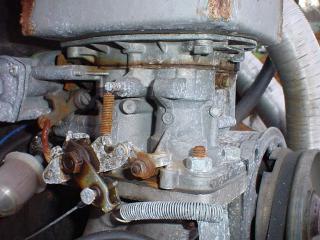
 What my carb looks like 2 years after the installation. It is kind of dirty with road salt residue. Note the neceessary extra return spring.
The roughly made box on top of the carb is an adaptor so I can use the stock air cleaner. The stock air cleaner is necessary because the Bug won't run right in cold or wet weather without intake aire pre-heating.
In removing the old manifold, I found that one end boot wasn't on the end piece, and the other boot had a huge crack (on the front where it can't be seen). I'm guessing that the lean wide-open-throttle and curious flat spots with the Solex were just due to vacuum leaks!
Anyway, my new Weber DFEV (well, it's a DFAV) is installed. This is a tricky process, and even more tricky on a later engine with the doghouse oil cooler and larger fan. The instructions were wrong regarding the alternator and fan. I had to remove the fan from the alternator shaft before I could get the alternator and old manifold off. It is necessary to remove at least on manifold end piece. I removed the left one. To get to the rear nut, I used a breaker bar which was a very close fit at an angle.
During reassembly, I discovered that the fan has to go in the shroud before the carb and manifold go on. It would have been best to install the alternator, and finally the manifold and carb. The new intake manifold can go in after the alternator because the heat risers aren't attached; they kind of have a slip fit. The front left nut on the alternator stand is very very difficult to reach with the manifold on. The front right nut on the carb is almost impossible to reach with the fan and alternator in place. Big problem. The solution with the carb turned out to be putting a 13 mm socket on the nut, then reaching in with an extension at an angle. The extension won't actually go in the socket, but it fits in just enough to turn the socket.
The throttle linkage is a problem. The carb comes with an extra arm that attaches to the VW cable. However, the return spring is way too weak, the the arm is at kind of a weird angle and the throttle barely opens all the way. It turns out that there is a separate kit with a different arm, spring, and spring mounting bracket. This wasn't part of the Weber carb kit, and wasn't mentioned when I bought the kit. I've temporarily jury rigged the return spring from the Solex.